Category: beauty

  • Friday Favorites: Canmake Eyeliner for Oily Eyelids

    Friday Favorites: Canmake Eyeliner for Oily Eyelids

    If you know me, you know (or maybe you don’t know because that might be weird) that I have OILY EYELIDS. To be frank, I don’t think I’ve ever met anyone with eyelids as oily as mine. Throughout the day, my eyeshadow would disperse and my eyeliner and mascara would smudge on my lower lids. So I couldn’t even imagine ever putting anything on my waterline or tightline. THAT WOULD BE EGREGIOUS. Eyeliner wouldn’t stick even on my regular skin, and I wanted to try and put something on the part of my eye that was probably the most oily and watery??

    Despite my reluctance, I’ve tried many times with water-proof and smudge-proof pencils, eyeshadows, and even liquid eyeliners. None of them worked. I would see reviews of how successful they were for all these other races, but trying it on myself as my Asian eyes, it was devastating.

    Until… I discovered Japanese make-up. There are a handful of Japanese make-up that I’ve come to use daily. These are my tried & true; they’ve really been put through the test because I’ve been using them for YEARS. One item that I give upmost reassurance is the Canmake eyeliner.
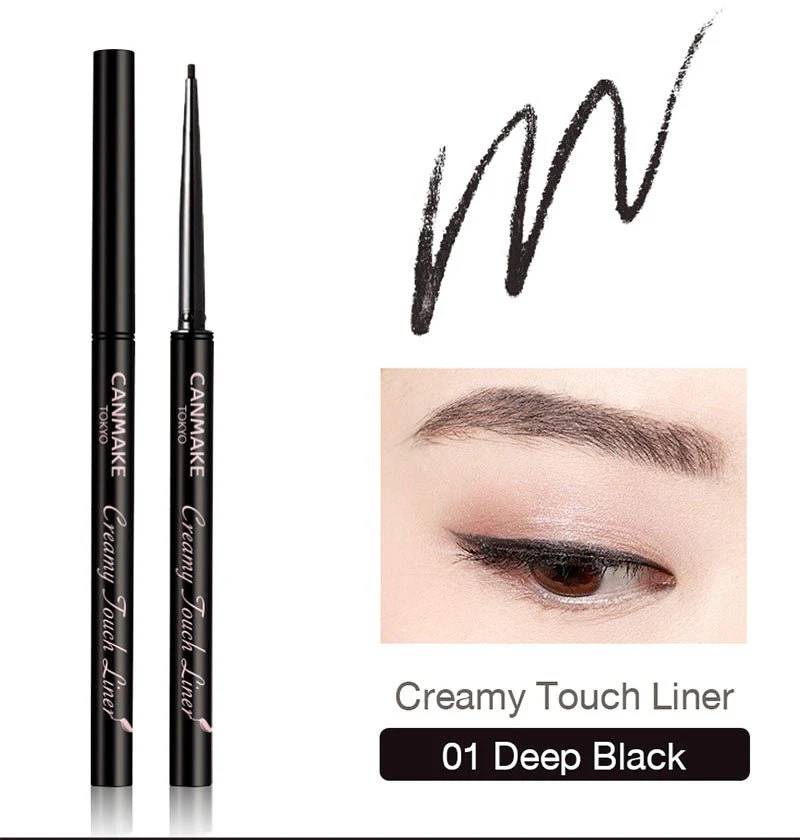

    Canmake Eyeliner

    The Canmake eyeliner comes in 10 colors. It has a very fine point tip for extra precision. Since I use this on my tightline, of course I go with the black color.


    Wear Test

    To put this to the ULTIMATE test, I wore this eyeliner for a red-eye flight. I had the eyeliner on since 12 PM and arrived at my destination at 8AM. That’s 20 HOURS OF WEAR. Mind you, I had it on as I walked around outside in the heat and humidity. It faced windy conditions when I climbed up 5 flights of stairs to an open rooftop. It faced the dry cabin of an airplane. It faced my eyelids being shut closed as I got some sleep. IT HAS BEEN THROUGH IT ALL. And what was the verdict?

    Understandably, the eyeliner did wear off from my tightline. However, it barely smudged! You can see that my eyeshadow started to crease on my eyelid, and there’s some residue on my lower eyelid. Nonetheless, it definitely doesn’t give me panda eyes like most other eyeliners.

    If this is the result after 20 hours of wear, then I AM SOLD. I will definitely be purchasing this on repeat until it’s discontinued (or until the company creates an even better product if that’s possible)!


    Pros

    1. 1.5mm ultra-fine tip for accuracy
    2. Vibrant colors from 1 swatch
    3. Glides easily
    4. Completely waterproof after it dries
    5. Oil and smudge resistant

    Cons

    1. It won’t stay on past 10+ hours or so

    Final Word

    This is clearly a favorite because the pros significantly outweigh the cons. Although it isn’t PERFECTLY oil and smudge-proof, it does the job better than any eyeliner or product I’ve used on my waterline or tightline.

    If you have issues with smudging, I highly recommend this product! If it worked well for me, then I’m confident that it’ll work even better for you!

  • Friday Favorites: d’Alba White Truffle Spray Serum

    Friday Favorites: d’Alba White Truffle Spray Serum

    I found this gem while in Seoul, South Korea. It was in an aisle where “hot items” were sold at Olive Young. It caught my attention because I’ve never seen a “spray serum” before, and it included “white truffle” from Italy. I’ve never had white truffle on my skin, but I loved it in my tummy! So I thought why not?

    That night, I immediately opened the product with overflowing excitement. The bottle fit perfectly into the palm of my hand. Packaged in a frosted tempered-glass material, the watery serum gushed inside. There’s 2 layers that can be seen: first, the serum layer which includes the Italian white truffle extract, niacinamide, and chia seed extract for skin relief and glow; second, the oil layer which has oil from various plants for moisture and radiance. I immediately tested it with a quick spritz, and the smell was exquisite. It was refreshing and luxurious. Now, it was time to actually test it.

    d’Alba White Truffle Spray Serum

    Instructions

    1. Cleanse face well by removing make-up and impurities
    2. Shake the spray well to disperse the oil evenly
    3. Spray 6 in. away all over the face, neck, and décolletage

    *Serums should typically be the first layer to any skincare!

    *Can be used morning and/or evening

    Wear Test

    Since I’ve been moisturizing my face really well, it’s hard to test the serum by taking before and after photos of my face; you can’t really see a difference. Therefore, I tested it on the back of my hand because that’s where it’s been really dry lately!

    BEFORE: Skin is dry and cracking; dots of flakiness can be seen.
    DURING: 1 spray evenly distributed the serum all over
    AFTER: Serum quickly settles into the skin and immediately hydrates; does not feel sticky at all. Skin feels soft and looks glowing.

    Pros

    1. Packed with antioxidants
    2. Vegan, hypoallergenic, & free of surfactants
    3. Non-comedogenic so it won’t clog pores!
    4. Hydrates and leaves skin glowing
    5. Compact size than can be taken on the plane (100 mL)
    6. Consistent and even spray nozzle

    Con

    1. Arguably, might be too “light” on the skin

    Final Word

    I have combination skin where parts of my face is very oily and other parts are very dry. Currently, my face is a bit more dry and irritated than usual because I’ve recently started using Retacnyl, which is a prescription retinoid that contains tretinoin. As I use this product, my skin can be very sensitive to many products. However, I had no issue with the d’Alba White Truffle Spray Serum!

    Although this is a serum, it feels like a face mist for a good “pick-me-up.” I can imagine myself putting this on on-the-go or in an airplane where the air can get super dry. If that’s the case, the packaging of this is perfect because it is exactly 100mL which is the maximum limit for carry-on liquids!

    Overall, this is a very easy and effective serum! Most serums come oil-based and can feel very heavy or sticky. However, this serum is the total opposite! It settles immediately into the skin and my skin felt hydrated and glowing. I noticed the effects right away. Also, since it is so lightweight, it is easy to layer other skincare and/or make-up on top.

  • Here’s Everything You Need to Know About the Cinderella Hair Treatment

    Here’s Everything You Need to Know About the Cinderella Hair Treatment

    I had the chance to travel to Kuala Lumpur, Malaysia, and experience a hair treatment I had heard a lot about—the “Cinderella Hair Treatment.” If you’ve ever visited Malaysia, you’ll know that the weather is incredibly humid, which is great for the skin but not so great for the hair. The humidity makes my hair prone to frizz, which is one of my biggest hair struggles. So, when I heard about this treatment, I was super excited to try it out and see if it could help tame my wild, frizzy hair in the hot, sticky climate.

    The Cinderella Hair Treatment Process

    The process itself was surprisingly relaxing, and it felt like a pampering experience. The treatment began with a thorough wash of my hair to cleanse it from any impurities or styling products. Once my hair was clean, a special solution was applied.

    The treatment works by infusing a blend of keratin and other smoothing agents like aloe vera, plant-based oils, and cysteines (i.e., an amino acid with straightening effects), into the hair shaft making the hair more manageable and reducing frizz. After the solution was applied, my hair was carefully blow-dried and straightened using a flat iron to seal the treatment in.

    Throughout the whole process, the staff was extremely professional, and the salon had a calm, serene atmosphere. The treatment took about 2 to 3 hours in total, and although it felt like a lot of time, it was totally worth it.

    After the treatment, its important to avoid washing your hair for at least 48-72 hours! This allows the treatment to fully set and the ingredients to penetrate deeply into the hair, ensuring long-lasting results. However, be warned that your hair will be THE FLATTEST IT WILL EVER BE DURING THIS PERIOD. Although it’s not cute in the short-term, we’re here to play the long-term game!

    The Effects of Cinderella Hair Treatment

    After the treatment, I was amazed at how smooth and shiny my hair looked. It felt incredibly soft and light, and the frizz was completely gone. My hair looked effortlessly sleek, even without styling it too much. The treatment also helped with the overall texture of my hair, making it easier to manage. It was the perfect solution to the humid weather I was dealing with.

    One of the best parts? The Cinderella Hair Treatment didn’t just work for a day or two—it kept my hair frizz-free for an entire month! No matter how humid it got or how much I was out in the rain, my hair stayed smooth and manageable. It was such a relief to not have to worry about my hair getting frizzy every time I stepped outside.

    The Treatment’s Longevity

    While I loved the way my hair looked after the Cinderella Hair Treatment, it didn’t last forever. After about a month, I started to notice that my hair was slowly getting frizzier again. The sleekness started to fade, especially around the roots and the ends. However, it still looked a lot better than it did before the treatment, and the frizz was much more manageable compared to how it had been in the past.

    By the end of the month, my hair wasn’t as smooth as it had been right after the treatment, but it was still in much better condition than before I started. The good news is that the treatment is completely safe for repeat applications, so I can always go back for a touch-up whenever I need it.

    A treatment like this is very similar to the Keratin Treatment (which is popular in the States) or even Magic Straight (which is popular in South Korea). I’ve done Magic Straight before, and the process is eerily similar. However, I believe the concoction they use on your hair is different. The Cinderella Treatment uses more “natural” ingredients while Magic Straight is very chemical; however, this allows for Magic Straight’s effects to be much longer-lasting. For someone with my hair texture (i.e., fine and very lightly wavey), Magic Straight was basically permanent and lasted years.

    Final Thoughts

    Overall, I’m so glad I tried the Cinderella Hair Treatment while I was in Kuala Lumpur. The humid weather can be a nightmare for anyone with frizzy hair, and this treatment definitely helped me maintain sleek and smooth hair for an extended period. Although it only lasted about a month for me, the results were fantastic while they lasted. If you’re struggling with frizzy hair in a humid climate like Malaysia, I highly recommend giving this treatment a shot—it’s totally worth it!

  • Laser Hair Removal For Asian Hair: The Good, The Bad, and The BO (Literally)

    Laser Hair Removal For Asian Hair: The Good, The Bad, and The BO (Literally)

    Okay, so let me take you on a wild ride through my laser hair removal experience, because it was definitely an adventure. Picture this: a 23-year-old Asian girl with the dark, stubborn underarm hair thinking, “Hey, let’s try something permanent…and intense.”


    Phase 1: Laser Away – The Bold Beginning

    I walked into Laser Away at 23 years old ready to rid myself of my underarm hair for good, or so I thought. I signed up for 8 sessions, which they assured me would be enough to say “goodbye forever” to my armpit fuzz. And you know what? The sessions were fast—under 5 minutes for both sides. They didn’t even need to warm up the laser before getting to work. You know those quick-fix beauty treatments that make you wonder, “Is it really working?” Well, spoiler alert: it was, but not entirely.

    I had to go back every month or so after each session. After 8 sessions, I could proudly raise my arms without worrying about stubbly underarms. But… cue dramatic music… there were still a few stragglers. Like, maybe 10% of the hair was like, “Nah, we’re not leaving anytime soon, thanks.” But it was 90% successful, which, honestly, I’ll take. Also, something about lasering your armpits made the area much lighter! So overall, I was happy with my initial experience.

    Phase 2: South Bay Med Spa – The Sequel

    Fast forward a bit, and I’m thinking, “Alright, let’s make this 100%!” I booked another 6 sessions at South Bay Med Spa to finish what Laser Away started. But, oh no, plot twist: my left armpit suddenly became the diva. It started acting up in a way that my right pit just didn’t—it hurt like a mofo. I swear, I have no idea why, but my left armpit became super sensitive. The laser felt SPICY only on my left armpit. Meanwhile, the right side was chill, like, “Hey girl, we got this, let’s go.” 

    My pain tolerance was usually strong, but I found myself flinching and clutching the table like I was about to go through labor. Who knew my body would decide to start playing favorites with my armpits?

    The BO Incident (Don’t Ask, Just… Don’t)

    Now, here’s where things get really interesting. A few weeks into my treatment, I noticed something… ahem, “extra.” For the first time in my life, I got some serious BO—and only in my left armpit. I’m thinking, “Oh my god, what is that smell? Is this… me?” Cue the internal panic.

    I had never been the type of girl to have smelly pits. Ever. But suddenly, it was like I had a whole new personality: the girl who needs to carry around extra deodorant in her purse. This funky side effect stuck around for about a year. Can you imagine? I went from “fresh as a daisy” to “smells like wet socks.”

    Results: Almost Perfect, But Not Quite

    After a total of 14 sessions (thanks to that left armpit diva), I was finally mostly free of underarm hair. I would say the treatment was 98% successful, which, to be fair, is pretty great. But after 4 years, I started to notice, like, two hairs or so that were still growing back. Two hairs! Just… why? At that point, I was all, “I can live with that,” but it’s still a little annoying to know those tiny hairs somehow survived the apocalypse.

    Would I Do It Again?

    It’s a mix of yes and no. Doing the initial treatment to get rid of most of the hairs is great! However, I wouldn’t do it again because now we have these at-home IPL hair removers, and let me tell you, they work, they’re affordable, and they can be used all over your body! I can use it on my legs, arms, and even the bikini area—all in the comfort of my home. And the cost? A fraction of what I paid for those laser sessions. It’s like, why pay for 14 sessions when I can do the same thing for way cheaper? Also, no surprise BO. 

    The IPL at-home laser that I use is called BoSidin. They’re sold on Amazon and have worked great! I love this device because it has 6 energy levels, 6 different modes (e.g., underarms, bikini area, legs, etc.), a mode for skin rejuvenation (which I have yet to try), a cooling option (to combat the sting from the laser), and an automatic function that will zap lasers continuously for when you’re covering a large surface area. The only downside is that if you have it on for a prolonged period, it’ll need some time to “recharge.” For example, after I go over an entire leg, it won’t be able to zap lasers anymore until I give it some time off. If I invested in a better IPL tool, I don’t think this would be a problem. However, I’m not too impatient, so I’m ok with this delay. 

    When you first start using the IPL laser, you’ll have to be super consistent to see changes. Using it several times a week will drastically affect the growth rate of the hairs! After being consistent like this for several weeks, hair will eventually stop growing, and you’ll only need to use it for maintenance maybe once a month or so! 

    So, if you’re thinking about laser hair removal, here’s my advice: Do it if you’re really committed and have the money, but honestly, those at-home IPL devices are a game changer. They’re convenient, cost-effective, and you don’t have to deal with random BO side effects that make you question your life choices. 

  • Powderbrows/Microshading is for the Asian Ladies!

    Powderbrows/Microshading is for the Asian Ladies!

    This is for my girls (and guys) who weren’t born with eyebrows like Gigi Hadid, Cindy Crawford, or Zayn Malik. Their eyebrows are naturally full, have a distinct shape, and fill the face. Sadly, this is the complete opposite to mine. My eyebrows are naturally very fine and light in color. Therefore, in certain lighting or camera filters, it looked like my eyebrows disappeared! I would feel like Voldemart, and it was such an insecurity of mine growing up.

    I would fill in my brows every single day, but it was such a hassle. I never could find a color that really matched. Even though eyebrows are supposed to sisters and not twins, mine looked like they weren’t even related. And I can’t even begin to tell you the journey of finding the right shape for me. I wanted professional help and a permanent solution.

    Over the years, “Instagram brows” became really popular. However, it looked so unnatural because the edges were cleaned oh so perfectly using a concealer, and the shape was too crisp. This trend became so popular that people started to tattoo their eyebrows in this way– and if you love it, then hey, more power to you! However, in my opinion, these eyebrows only matched a look that’s full-glam. On the regular day-to-day with little to no make-up on, it looked strange and out-of-place. So unfortunately, this was a pass for me.

    “Intagram brows” (circa 2010s)

    Some more years passed and the microblading technique started to popularize. This is a technique where eyebrow hairs are copied using stroke patterns from the technician. However, I noticed two main issues with this style. First, in order for it to look natural, the person needs to already have a decent amount of eyebrow hair. For someone like me, the tattooed strokes would be an obvious contrast to the rest of my brows. Second, in photos, microblading looks amazing. However, when I saw it in-person, there wasn’t a single time where I thought it actually looked good. (However, please keep in mind that I’m mostly surrounded by Asians. Therefore, I realized this technique does not seem to suit Asian features.) So again, this was a pass. 

    Microblading technique

    Fast forward to 2023, and I meet with a girlfriend who I’ve known since we were kids. She shares with me that she had her eyebrows tattooed a few weeks prior, and my jaws dropped to the floor. I was absolutely stunned because it looked SO natural. It really only looked like she filled in her brows using a powder or pencil. Immediately, I looked into what technique this was and where she went.

    I learned that this style of eyebrow tattoo was called “powderbrow” or “microshading” because it mimics the look of filling in brows with powder. Also, instead of using stroke-like patterns, the technician uses thousands of small dots that are placed throughout the brow. This allows for an extremely natural look because the gradient can be controlled giving the eyebrow an ombre-effect (i.e., lighter on the inner brows to darker on the edges). I also learned that this technique is much better for the skin because it causes less trauma than microblading which cuts deep into the epidermis with each stroke. This is better for the ink as it will fade cleaner overtime reducing the risk of the color changing and leaving any permanent scar. 

    Powderbrow/Microshading process

    I was TERRIFIED of getting my eyebrows tattooed because I’ve seen so many horror stories of people ending up with atrocious eyebrows. However, I was at a point where a professional’s mistake was probably better than what I usually do to my brows. And HANDS-DOWN, THIS WAS THE BEST DECISION I HAVE EVER MADE IN MY LIFE! My only regret was that I didn’t find something like this sooner! 

    The eyebrows came out so natural, and the color was perfect for my skintone. If you’re ever in Los Angeles, CA and in need of an eyebrow tattoo, I highly recommend Jina! Her instagram is @tattoo_by_jina, and she is AMAZING. She is so meticulous with her craft, and now, she’s the only person I trust.

    My first powderbrow session with Jina!

    The process will start with numbing your eyebrows. Then, you can tell her what you’re looking for (e.g., dramatic or soft arch, dark or light, etc.). She will clean up and map out your natural eyebrow shape and adjust based on your feedback. Then, she’ll find a color that suits your skin tone or hair color (up to you to decide)! And within 30-45 minutes, you’ll have new eyebrows! You can “test” it out the first month to see if there’s anything else you’d like to change. Then, within 4-6 weeks of the initial appointment, you’ll have to meet again for the final touch-up. This is where you can add any final touches on your eyebrows. 

    For me, during my first appointment, we went with the natural shape of my eyebrow. However, after wearing it around for about a month, I realized I liked an even softer look on my face. Therefore, for my touch-up appointment, we decided to make it a bit straighter. And JUST LIKE THAT, MY EYEBROWS WERE PERFECTION. It was better than anything I could’ve imagined, and I am so beyond happy with the results! I talk more about my experience in the vlog below. (:

  • Pico-Toning & Pico-Laser for Glass Skin (with Before and After Photos!)

    Pico-Toning & Pico-Laser for Glass Skin (with Before and After Photos!)

    What is Pico-Toning & Pico-Laser?

    Pico-Toning: a non-invasive laser that is used all over the face to treat uneven skin tone for a brighter and smoother complexion. There is typically no down-time. Patients are recommended to regularly wear sunscreen and avoid actives (e.g., retinol, AHA, BHA, etc.) in their skincare. 

    Pico-Laser: a non-ablative laser that targets common skin imperfections (e.g., melasma, sun spots, acne scars, etc.) to break down the pigment and rejuvenate the skin. The lasered area will scab for several days, but once the scab falls off on its own, the area will be free of the imperfection! During this time, a cream is given by the clinic to apply every day for at least a week. Active ingredients in skincare and harsh exfoliants should be avoided. For darker or deeper skin imperfections, several treatments may be required.

    *Typically, both the Pico-Toning & Pico-Laser are recommended together and can be completed at the same time in one session

    *These treatments will NOT get rid of moles!


    Cost

    As of December 2024, both the Pico-Toning & Pico-Laser treatment at the VandS – Gangnam Branch was 182,000,000₩ (or about $130 USD). 


    My Skin Concern 

    Living in California where the strength of the sun is extremely high, I started to get sun spots in my late 20s. They were especially gathering on my upper cheekbones. More specifically, as you can see from the photos, the majority of the sunspots formed on my LEFT cheekbone. Why? Because the sun glares through the window as I’m driving and hits the left side of my face.This is a true testament to how much the sun damages your skin! Although they weren’t too bad, I wanted to do something about them before they got worse. (All Asians know that sun spots, if not treated, will grow darker and bigger!) Therefore, I wanted to be proactive and take the necessary precautions. 


    The Process

    At VandS Clinic in Gangnam, the staff were very friendly and helpful! The entire process was very thorough starting with a skin-analysis photo. Afterward, a specialist went through each photo describing the strengths and weaknesses of my skin. This conversation was very helpful because it made me realize what I needed to do for my skin to maximize its condition. Some issues could be tackled using their most innovative tools (e.g., lasers, injections, etc.) or it could simply mean I needed to moisturize more in certain areas while exfoliating others parts. 

    Below shows a chart that depicts my comprehensive skin analysis in a nutshell. I learned that my pore size is a skin concern because having large pores on my cheeks puts me at risk for developing wrinkles faster since there is less elasticity. Therefore, I have to regularly use chemical exfoliants like BHA in this area which should help with the pore size and allow for a brighter, healthier complexion. 

    The skin analysis not only showed data about my pores, but also showed results for future wrinkles, redness, skin tone type, wrinkles, melanin, acne, pore, pigmentation, sebum, brown pigment, and radiance. Each photo shows whether you’re good, normal, or bad for each item and highlights the results on your photo. For example, for my sebum analysis, all of the white dots show where I tend to release the most amount of sebum (which is seen on my T-zone). Advice is provided in the report as well, detailing the concern of having too much sebum and recommending what to do. 

    During my consultation, we focused on the sunspots and what we could do to minimize it. The specialist recommended pico-toning and pico-laser, which sounded perfect for me. They numbed my entire face and within 30 minutes, I was in the treatment room. The nurse started with the pico-toning laser all over my face and then moved on to the pico-laser which is more precise and targeted at specific problem areas. For both treatments, I felt absolutely no pain whatsoever! I wondered if I even needed to numb my face at all. Below is a photo of what my skin looked like immediately after the both treatments. From Pico-Toning, my skin was already clearer and brighter. From the Pico-Laser, the areas where it targeted were clearly inflamed.

    Inflammation from the Pico-Laser

    Within a day or two, scabs started to form. However, the scabs didn’t feel like typical scabs. I was imagining it to be bulky and rough (like the scabs that form when you fall down and scrape your knee). However, they were minimal and could be barely felt even if I brushed my fingers against it. Unfortunately, I don’t have the best photos of it– but this gives you an idea of what it looks like!

    Every morning and night, I used the cream they provided at the clinic over the scabs. Within the next several days, I noticed they started slowly falling off. By the end of the week, they were all gone! My right side of the face is nearly flawless; the left side probably could use one more session, but at least the rough texture of the sun spots are gone! The clinic did mention that in Korea, people regularly get this treatment at least once every 6 months to a year. I’m not sure if I’ve seen this exact treatment in the states, but every time I go to Korea, this will be on my to-do list!